Workflow Configuration Options
Here you'll find all of the information you need to work with Workflow configuration options!
Checklist Item Admin
Here's how to work with checklist items in the Workflow Admin:
1. Go to Workflow Admin to create a new Workflow
2. In Admin, create a new checklist item
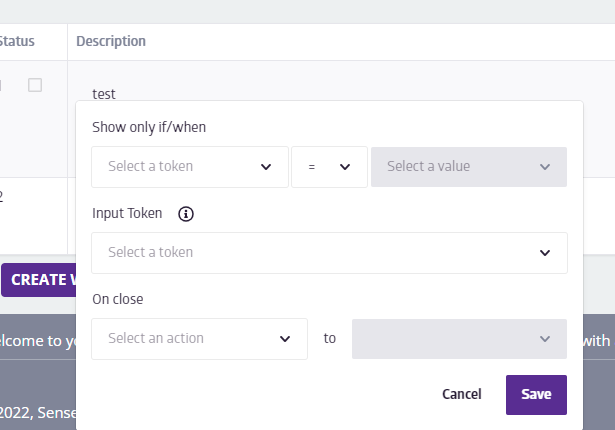
3. If you want this checklist item to adjust Task status or Task assignee on close, click on "Advanced Options"
4. You will see a dialog box

5. Under the "on close" header, use the first dropdown to select what you'd like to change. You can select "Change the task status" and "Assign the task"
6. Use the second dropdown to select the status (when changing status) or, select the user/queue/token when reassigning.
Conditionally show/hide Template intake form inputs
Sometimes you may want to hide an input until the assignee selects a specific option. For example, for a new hire intake form, we might ask an initial question "Mac or PC", and then want to ask a follow up question if the assignee selected mac "Macbook air or Macbook pro".
To set these rules, go to Workflow admin and click on "input form' in the right hand menu to access the display rules:
Click on 'add rule' to get started. From there you can select the following:
1. The primary input token: The token that we will monitor to determine if we should show/hide other input tokens (this must be a dropdown or yes/no radio button token)
2. The primary token value: The value for that token that should trigger us to show other inputs.
3. The conditional inputs. The other input tokens that should be displayed if we match the rule above.
In the example below, we have a token "feedback category" of type dropdown. If the user selects "academy" from that dropdown, we want to show a different input called 'feedback details"
If you have any questions regarding these features, please reach out to your Customer Success Coach or the Support Team.
Comments
0 comments
Please sign in to leave a comment.